Volume 9: How Would ReproNim Containerize a Workflow
Version 0.7, published August 27, 2020.
Change log
Version 0.5: Published April 5, 2020.
Version 0.6: Published May 25, 2020.
Version 0.7: Published August 27, 2020. Formatting for Sphinx.
Authors: Peer Herholz and The ReproNim Team1
Special Thanks to: Fabrizio Pizzagalli, Neda Jahanshad and Paul Thompson at ENIGMA.
Overview
Stakeholder: Data Analyst
Problem Statement
Imagine you are part of a tremendously large research project that has collaborators all over the world and you are responsible for creating comprehensive neuroimaging data analysis workflows.More specifically, the research project focuses on mental health, has thousands of participants and you are tasked to create a pipeline that computes and extracts anatomical brain shape features from MRI brain data in volume and surface format generated by the FreeSurfer2 structural analysis pipeline. A good real-world example of such an endeavor is the Enhancing NeuroImaging Genetics through MetaData (ENIGMA) project3. After a very long development time (several months or even years), your pipeline (in this case /home/frodo/work/enigma/shape_features_pipeline)is working robustly and ready to be shared with hundreds of collaborators all around the world. Not long after you shared your script via Email, you receive hundreds, yes hundreds, of responses, all stating that your pipeline isn’t working and won’t even start running. What is happening? It worked perfectly fine for you, hence they must have all been doing it wrong… But then it hits you: nothing is wrong, everything works for you, however, only you. In this case “you” refers to your computing environment, the resources and setup you used all this time to create your pipeline. It was never tested somewhere else. Maybe you are not aware of it, but prior research work (insert references here) showed that everything from the base, the operating system, to the top, specific versions of libraries, and everything in between can and will have an influence on your results. This encompasses everything from different numbers at the 10th decimal place to changes with regard to significance of your hypotheses. What now? Is it like the end of the Lord of the rings:
“How do you pick up the threads of an old life? How do you go on, when in your heart you begin to understand… there is no going back? There are some things that time cannot mend. Some hurts that go too deep, that have taken hold.”?
Behold, all is not lost, ReproNim to the rescue!
ReproNim Solution
In theory
Ideally, going full ReproNim, every you do is under version control, FAIR and reproducible: from data, through analysis workflows to results. At this point in time, we have all the resources to make this a reality and standard. Instead of only working on your machine, your analysis pipeline can be made fully reproducible everywhere by utilizing container technologies such as Docker or Singularity. Instead of everything breaking down after changes, these containers and the workflow can be placed under version control through DataLad4 and git5. The former allows you to put your data under version control to prevent the following situation(s): “What happened to my data? What did you do with the data? Why are 20 participants missing?” and many more. Last but not least, these tools leverage repositories, so that everyone can find and reuse your resource without having to ask you for it and you handling hundreds of emails in case of updates and/or changes. Depending on your level of experience and training this all might sound like rocket science and fairytales to you. However, it’s all real and all possible to understand and implement yourself. ReproNim is here to guide you along this exciting journey that will save you and countless other folks an immense amount of time and stress.
In Practice: The Gory Details
Enough talking! Pitter patter, let’s do this! To start from the beginning we prepare a few things. What we, that is you, need is the following: git, a GitHub or GitLab account, Docker or Singularity and DataLad (provide links for all). Please note: for this guide, we’re assuming you are using GitHub and Docker. The other resources work comparably, but may differ in small aspects and can be the topics of future chapters of this document. On a related note: these tools work best/natively under Unix based systems such as Linux distributions and macOS. Windows users should consider using the Ubuntu subsystem (reference).
Step 1: Create a project directory and place it under version control.
We start with creating a project directory (we will call it enigma_shape), that will be placed under version control and within which we will work on the pipeline and containers.
We create the project directory:
$ mkdir /home/frodo/enigma_shape
go into it:
$ cd /home/frodo/enigma_shape
and initiate version control:
$ git init
As a result a hidden file called .git will be created in our project directory (/home/frodo/enigma_shape/.git). Great, with that we have already completed one of the most crucial steps: providing the possibility to track and log every single change we make to whatever being placed in our project directory. As a first and very common step, we can create a README file that explains the content and goal of our project, among other potentially useful and important information. Using your favorite text editor (nano in the example), create the README file. In this example, the first line creates a file called “README.md”, the second depicts the text we want to include and the third/fourth closes and saves our newly created file:
$ nano README.md

This is the project of the ENIGMA anatomical brain shape feature
pipeline.

crtl + x

y
Now we have to add this file to our version control:
$ git add README.md
While we are at it, we will move the scripts we have worked on to this directory as our goal was to place these files under version control for further development:
$ mv /home/frodo/work/enigma/shape_features_pipeline /home/frodo/enigma_shape
$ git add shape_features_pipeline
This is our new beginning, our new year zero. Everything we will do to the analysis pipeline from this point in time onwards can and will be version controlled. This includes adding the README.md and our scripts to the “new” project. In version control terms, we ‘commit these changes’. While doing so, we make sure to include a helpful and informative commit message that tells us (and our future selves) what we have changed:
$ git commit -m “Add README.md and current version of scripts.”
To make everything FAIR, speed up the development process and create the opportunity for interaction and collaboration, we will make our project available on GitHub. To do so, we have to create a respective project on GitHub first:
Login to your GitHub account
Click on “New repository” and name it “enigma_shape”
Click on “Create new repository”
With that, we have both the parts we need to make this collaborative: our local repository where we will work on, test and implement changes and our remote place on GitHub where we will “push” our changes to.
$ git remote add origin git@github.com:frodo/enigma_shape
$ git push -u origin master
Shortly after, our project and the included files, along with the changes we committed can be found on GitHub, either visible for everyone (ideal case) or only your collaborators. In either case, folks can go to your repository and download the resources without you having to send everything per email. Once downloaded, they can also run the analyses. Oh, wait…wasn’t there something? Yes, there was. Namely, the whole reason you are reading this: they most likely still cannot run it, as the pipeline only works for you and your machine/setup. We also have to provide the corresponding necessary computing environment. But how can we do that? Buying hundreds of laptops on which we put clones of your machine? Maybe yes, maybe no, maybe we will see how in Step 2: Isolating and sharing computing environments.
Step 2: Isolating and sharing computing environments.
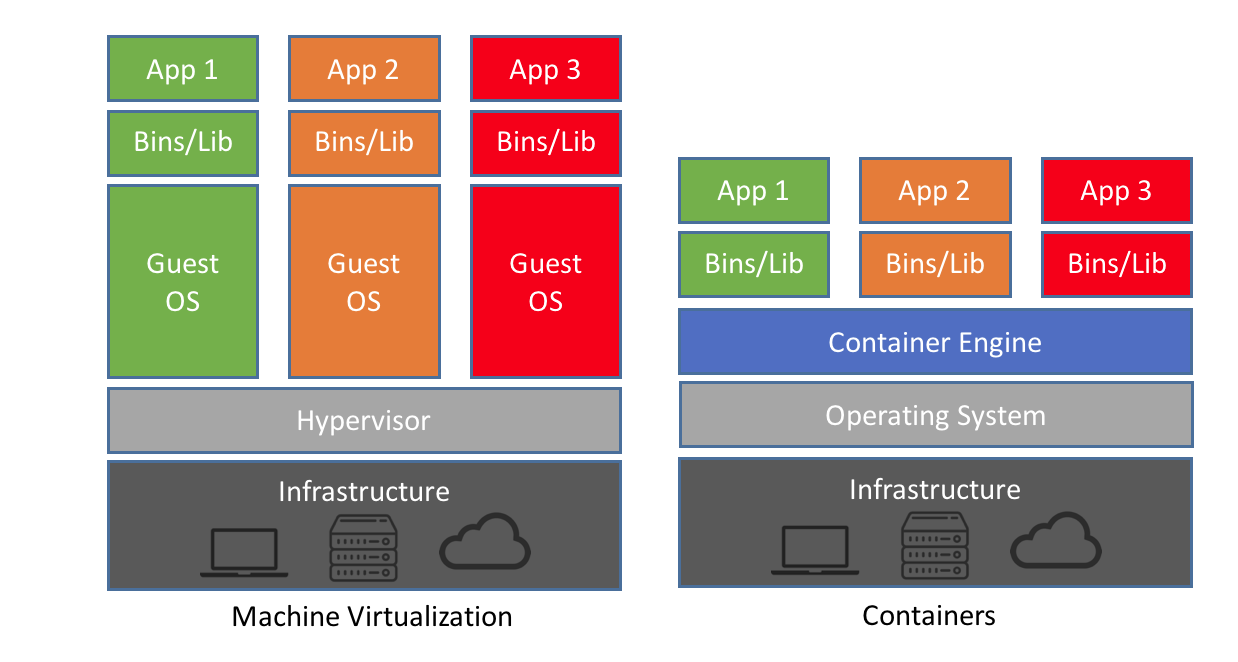
To answer the question (hundreds of laptops?) from before: hard no. Ain’t nobody got money and time for that (also think about the environment). Instead we are going to utilize virtualization techniques (reference?) that allow us to create, modify and share entire computing environments. As crazy as this might sound, it is actually a commonly and widely used procedure these days, with a lot of software and tools depending on it. While there are different ways to achieve the goal of virtualization, we will go with so-called “containers” given their efficiency, lightweight setup and supporting resources (including online repositories). As you can see below in Figure 1, the reason why they are so convenient and efficient is because, unlike other virtualization methods, they do not simulate an entire guest operating system with the respective resources, but utilize the resources (CPU, RAM, etc.) of the machine on which they are running on through the “container engine”. On top of that are the binaries and libraries, as well as specific applications.
https://blog.netapp.com/wp-content/uploads/2016/03/Screen-Shot-2018-03-20-at-9.24.09-AM.png
As mentioned before there are Docker and Singularity. Both are highly comparable in terms of usage and implementation. However, as Docker easily escalates root privileges it is not suited for HPCs and similar architectures. For these cases Singularity, where the user is identical within and outside the container is more appropriate. Within our adventure, we will use Docker, but include a section on Singularity in the end.
So, back to our goal: isolating and sharing computing environments. Based on the (super) short primer above, this becomes a bit more understandable. In brief: we have to recreate the computing environment that was used to develop and test the pipeline. Depending on your “IT/Computer” knowledge level, this is more or less straightforward. The process of creating containers is actually helpful in understanding the necessary steps: containers are created or “build” based on different “layers” which are specific components of your computing environment. These aspects are indicated within so-called Dockerfiles (https://docs.docker.com/engine/reference/builder/) which are used during a container’s build process and depending on your pipeline or whatever the container should do, these Dockerfiles can become very large and complex. However, we are once more lucky, as ReproNim created a tool to help you with the robust, reliable, reproducible and easy creation of Dockerfiles. Instead of writing everything by hand, including Docker specific commands, we can use Neurodocker (https://github.com/ReproNim/neurodocker), a docker container to create custom Dockerfiles to use within container builds. Yes, you heard me: a Docker container to create Docker containers, it’s Dockerception! Neurodocker, as the name suggests, is intended for creating neuroimaging related containers (nevertheless, it of course also works for other purposes). With only a few lines of code, we can create exhaustive Dockerfiles, ready to build our dream container. ‘Nough said, let’s start.
First, we need to download the Neurodocker container in order to use it. Docker containers, no matter how small or large, no matter the purpose, can freely be shared on DockerHub (https://hub.docker.com/), an online repository for and home to thousands of containers. The Docker jargon for downloading a container from dockerhub is “pulling” and works as follows:
$ docker pull username/container_name:tag
Where docker runs the Docker application, pull indicates what we want to do (here pulling a Docker container from Dockerhub and the last part is the specific container we want to pull. In more detail, username is the Docker ID of the person or organization who created and uploaded the container you want to pull. Container_name is the name of the container you want to pull and tag is the particular version of the container you want to pull. Important note: if you don’t include tag Docker will, by default, pull the latest version of the container. Moor precisely, Docker will search for the container version that is tagged with ‘latest’. In ReproNim terms: this is not cool. With the flow of time, versions (and hence ‘the ‘latest’ version) will change, so ‘latest’ today is not necessarily the same as ‘latest’ next year or last year. If the container version changes, it may not work the same as with other versions. Therefore, make sure to always use a specific version. This holds true for all containers you will end up using in your research. There’s no use in running containers if their version is not distinct, as you will end up with the same problem as why we are here (only not on your local machine, but within the realm of containers). Now, that we talked about that, let’s adapt the docker pull to our needs.
From Neurodocker’s page on Dockerhub (https://hub.docker.com/r/kaczmarj/neurodocker/ ) we see that we should type and execute the following:
$ docker pull kaczmarj/neurodocker
Translating it again, we are going to pull the neurodocker container from kaczmarj (this is Jakub’s Docker ID, the person who mainly develops Neurodocker within ReproNim).
But wait…we forgot the tag. In every repository on Dockerhub you will find the tag tab, which, after you clicked on it, will display all available tags for a given container. For Neurodocker, as of this writing, this is how it looks:
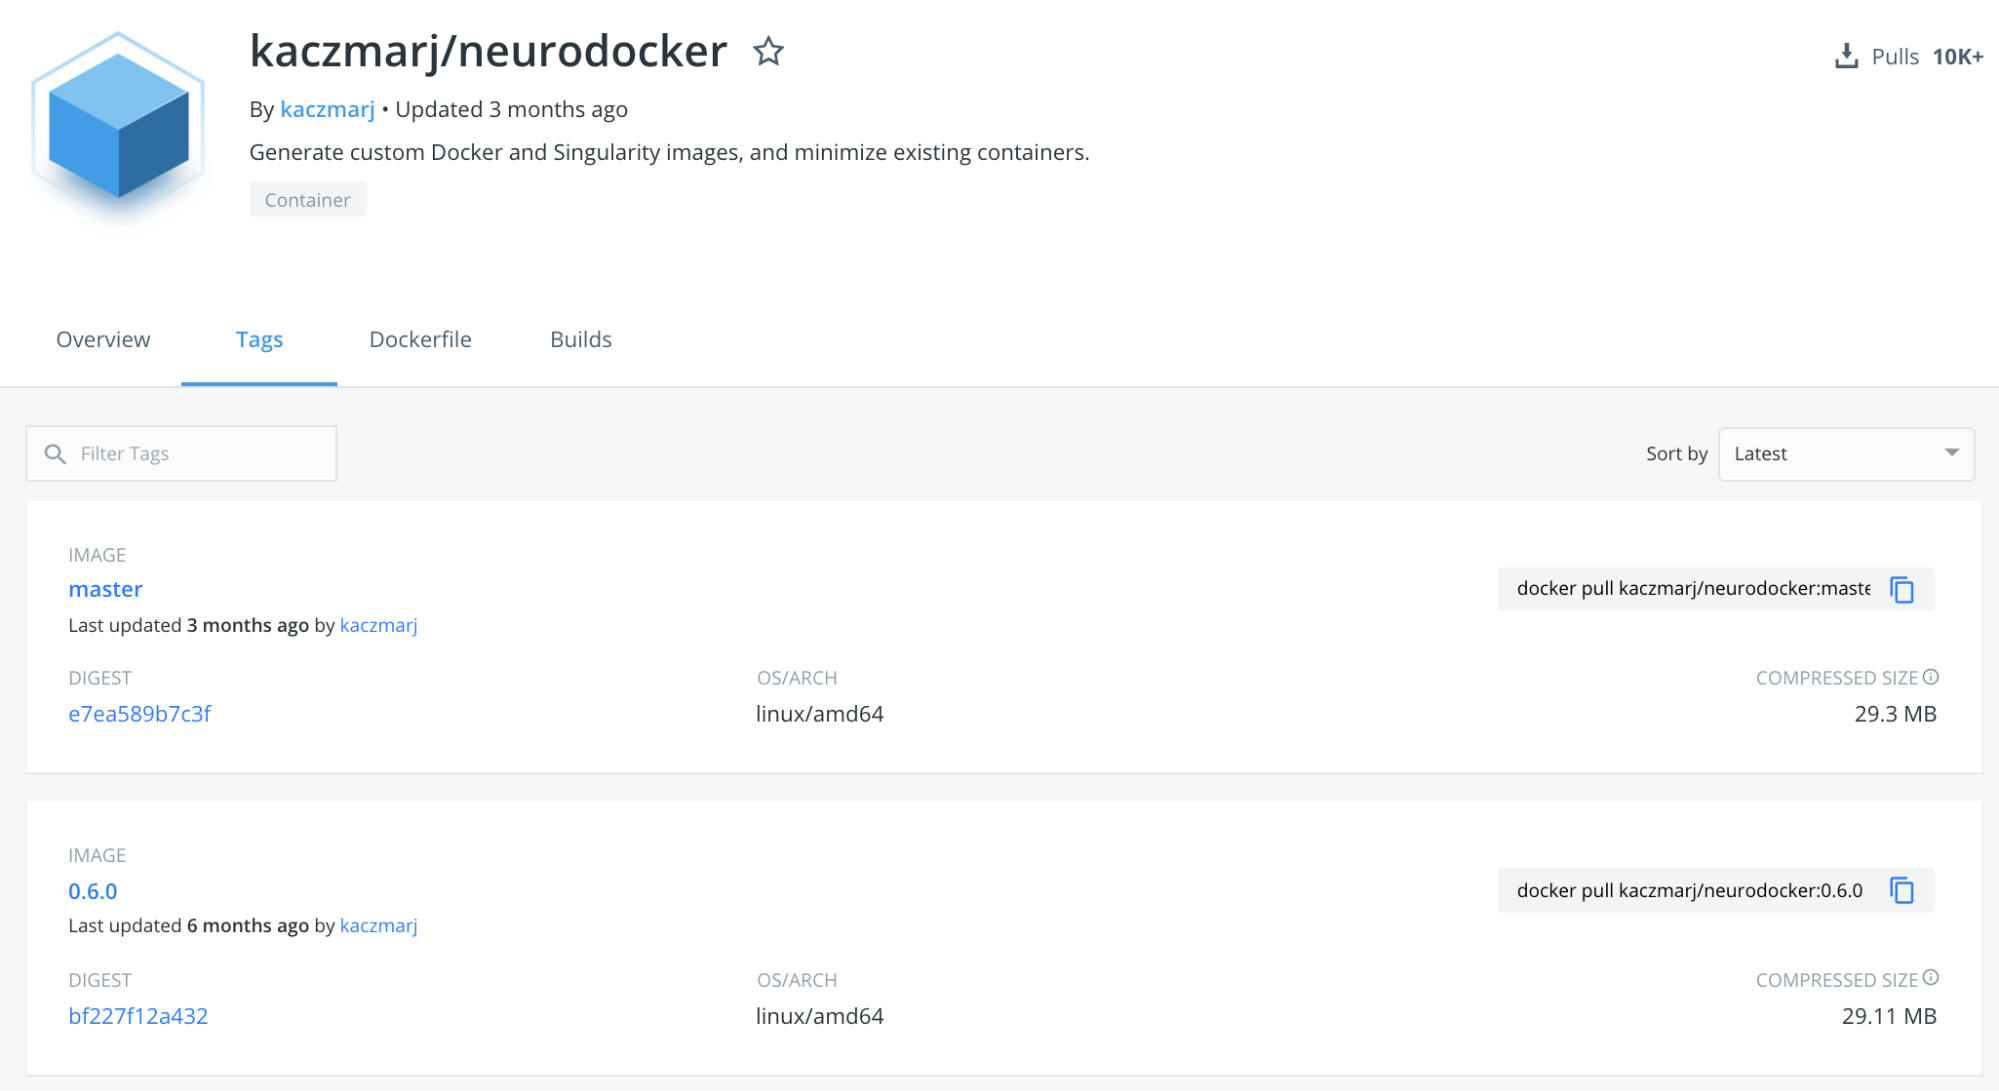
We will use the latest version with a specific tag, in this case: 0.6.0. Our complete Docker pull command thus is:
$ docker pull kaczmarj/neurodocker:0.6.0
After executing this command, you should see something like this:
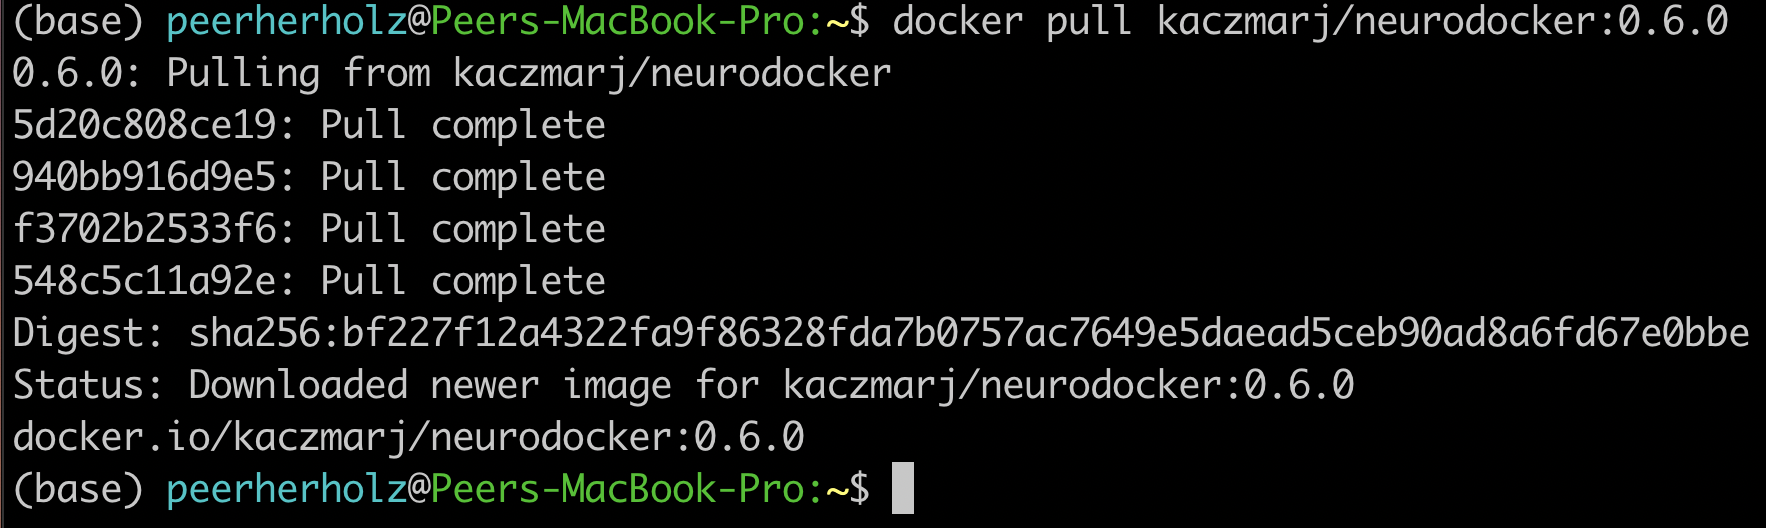
After stating the version of the container and where you are pulling it from, you see four lines of cryptic number/letter combinations, followed by “Pull complete”. These are the aforementioned layers that are necessary to compose and create a given container. After that you get a digest of the sha and the status message
“Downloaded newer image for kaczmarj/neurodocker:0.6.0”
telling you, that you successfully pulled the container. In case you don’t believe it (or me), you can run the docker images command to verify that the image is there, additionally providing useful information which includes the size of the image and when it was build:
$ docker images

With that, we are ready to use Neurodocker to build not only the container we need, but also the one we deserve! This is where the fun really starts, as we now have the opportunity to recreate our computing environment, isolate and share it. We can rebuild it, we have the technology. From the Neurodocker page, we can grasp that it is used, as most other Docker containers, through the command line and provides a broad range of input arguments and settings. As it’s neither mine nor your first day in the computer realm, we can anticipate some trial and error along the process. Hence, let’s put our Neurodocker adventure in a small script that will ease up the process big time and also, you already guessed it, make it more reproducible. Long story short: we create a bash file in our project directory and add some information:
$ nano generate_enigma-sulci_images.sh

#This is the neurodocker script to create the ENIGMA shape features pipeline container.

ctrl + x

y
Great! Off we go to the next step… HA, gotcha! You forgot to add this new file to git, didn’t you? Please go to the corner of unreproducible research and write “I need to add project files to git” one hundred times. Go, I’ll wait…Done? Good. Let’s add our new file:
$ git add generate_enigma-sulci_images.sh
$
$ git commit -m “Added generate_enigma-sulci_images.sh”
Better than standing in the corner, isn’t it?
From the examples included in the Neurodocker repo, we can see that we can define a little bash function to help us. We will add that part below our little explanation:
$ nano generate_enigma-sulci_images.sh

set -e
generate_docker() {
    docker run --rm ${image} \
    generate docker \
}
The first line “set -e” is a bash specific setting that will result in an immediate exit of our little script or “program” in case an error appears. The next part “generate docker() {}” defines a function called “generate docker” with the function being whatever is inside “{}”. In our case this is “docker run –rm ${image} generate docker” which is the Docker command for running an image, here “${image}” and “generate docker” is already part of the input arguments or settings of what this “${image}” should do, in this case, generating a Dockerfile. You might wonder: “What is ${image} actually?”. Good question! It’s a super important variable we have yet to define. Remember the “tag” side quest we had above? This of course also applies here, as we need to set the specific version of Neurodocker we want to use. Reproducibility transcends every level and aspect folks6. Obviously, we are going to use the version we pulled earlier:
set -e

image=kaczmarj/neurodocker:0.6.0

generate_docker() {
    docker run --rm ${image} \
    generate docker \
}
We now have the backbones of our script ready, as we defined a function that runs a specific version of the Neurodocker container and indicates that we would like to generate a Dockerfile. From the examples, we see that we should define the input argument “–base” next. This is the underlying operating system or “This is the operating system on which we will build our computing environment!”. Container virtualization relies on UNIX based system, in this case Linux distributions. While it’s possible to build Windows containers (REFERENCE), macOS is not supported (not to say that maybe somewhere in northern California (no, not Napa Valley, a bit below) this exists). Instead of creating a shock for you, it should create a feeling of relief as the majority of neuroimaging analyses software runs natively on Linux but not Windows or macOS (here macOS is actually doing ok because of its UNIX lineage). With regard to our case, we are also lucky, because you used Ubuntu 12.04 to develop and test the pipeline. Creating a container running Ubuntu 12.04 is fairly easy based on our little function and Neurodocker, as we just have to add the –base argument:
 set -e

 image=kaczmarj/neurodocker:0.6.0

 generate_docker() {
     docker run --rm ${image} \
     generate docker \
     --base ubuntu:12.04
}
Furthermore, it is stated that we need to include the “–pkg-manager” argument which will set the Linux package manager we want to install and later utilize within our container. We will go with the classic ”apt”:
set -e

image=kaczmarj/neurodocker:0.6.0

generate_docker() {
    docker run --rm ${image} \
    generate docker \
    --base ubuntu:12.04 \
    --pkg-manager apt
}
As we can see from the documentation, the output of this function will be text. Thus, we will direct or pass it into a text file (or better yet, a text file named ‘Dockerfile’).
set -e

image=kaczmarj/neurodocker:0.6.0

generate_docker() {
    docker run --rm ${image} \
    generate docker \
    --base ubuntu:12.04 \
    --pkg-manager apt
}

generate_docker > Dockerfile
Given that we use Ubuntu 12.04 as our base, we need to remove “locale specific settings” as Neurodocker has some problems with such old Linux distributions. As this is unfortunately really outside the scope of our adventure (yes, there’s a thing as too many side quests), I would like to point you to this thing called “the internet” if you want to follow up on this. For now, we will remove the corresponding parts of our Dockerfile which can be found in line 29-31:
set -e

image=kaczmarj/neurodocker:0.6.0

generate_docker() {
    docker run --rm ${image} \
    generate docker \
    --base ubuntu:12.04 \
    --pkg-manager apt
}

generate_docker > Dockerfile

sed -i '29d' Dockerfile
sed -i '29d' Dockerfile
sed -i '29d' Dockerfile
That’s it! That’s all we need. Before we conduct the first test run, we need to commit the changes:
$ git commit -m “update generate_docker function, base, pkg included”
You waited long enough, let’s run it:
$ bash generate_enigma-sulci_images.sh
If everything went according to plan, you should see a new file called Dockerfile. If you open it (e.g. using your favorite text editor), you should see some cryptic things with some words that appear to be familiar. Nope, these aren’t hieroglyphs, these are Docker specific commands that are set within a Dockerfile and used within the build process of Docker containers. By now, you are glad that Neurodocker did write that for you, eh?
As usual, we will add our new file to version control and commit changes:
$ git add Dockerfile
$ git commit -m “add first version of Dockerfile”
Everything is logged and we are good to go, our first custom made container awaits. We will use the docker build command as follows:
$ docker build -t enigma-sulci .
Where docker runs the Docker application, build specifies the Docker command we want to run, -t provides our container with a and . indicates that the information and settings found within the Dockerfile present in the current directory should be used to build our container. Upon running this command you should see something like the following (please note that I won’t include the complete output as it’s very long, but only the parts we focus on):
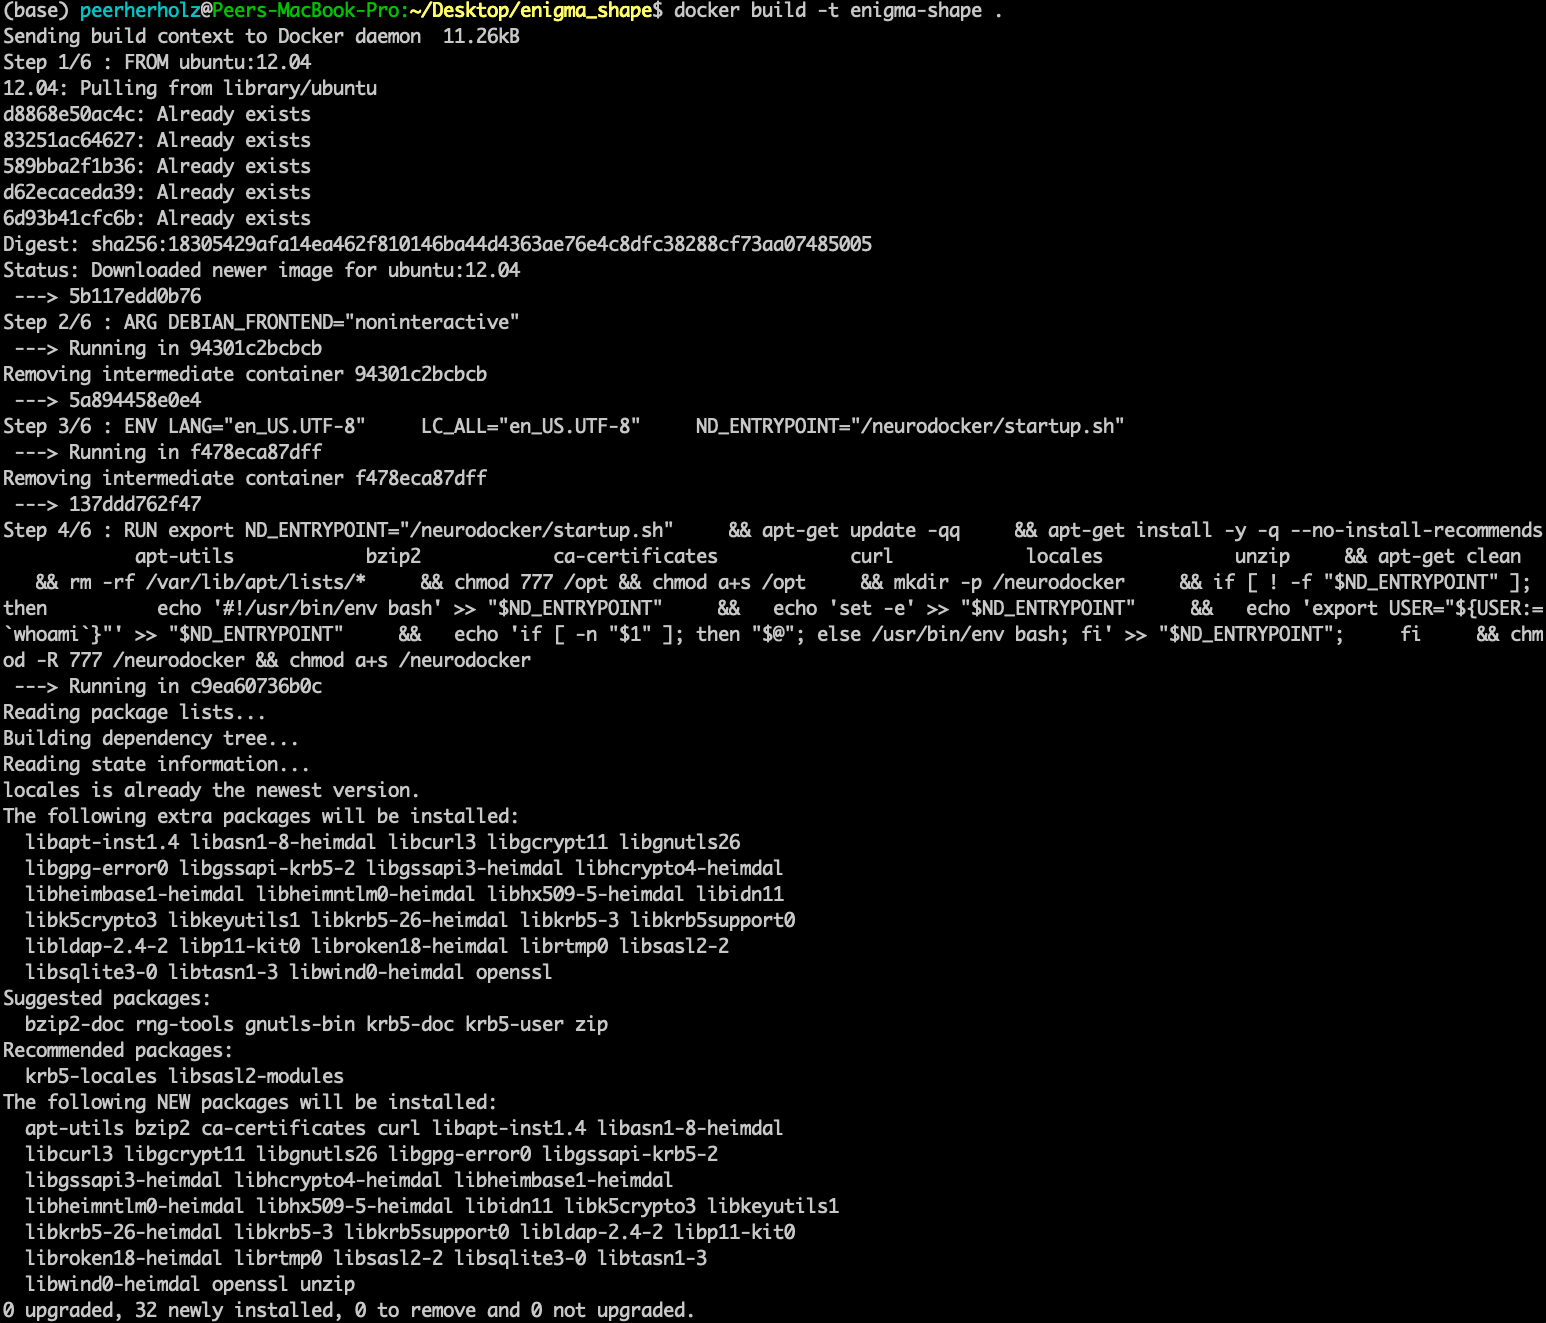
We can see our container being built with the specifics we set. At first our base is pulled from Dockerhub. Yes, another dockerception moment! As mentioned before, we will create our custom container based upon a certain operating system. This is already in a Docker container and we will use this instance as a starting point from which we will go further. Next, the package manager is installed along with some basic libraries. And with the line

our container is done-zel washington. Not kidding, it was as easy as that! Don’t believe it? Use docker images to verify that our container is in fact there.

Now, you are feeling it right? This immense power? The incredible, endless possibilities? Please, as always: don’t get corrupted by it. That’s the path to the dark side. But wait…here, the dark side is actually good, as it’s fully reproducible! Phew, existential crisis averted. Let’s use the momentum and keep going. Our next building block are libraries and binaries we are going to need for our pipeline to work properly. This part heavily depends on your workflow and pipeline, except some very common libraries and binaries. To be honest, this part is quite often trial and error as you are most likely not aware of all the things running in the background that are essential for your operating system and thus specific application. Lessons learned, eh? If something is missing, you will receive an error message stating something like:
“error while loading shared libraries: *library_name*: cannot open shared object file: No such file or directory”
In this case, use your favorite search engine to search for this particular problem and with a fair chance you are not the first one to run into this and someone has posted the solution which, in the majority of cases, is to install whatever is missing. As we’re going to use neurodocker’s “–install” argument to provide a space separated list of libraries that should be installed, you can just add “missing parts” and rebuild your container. For our current example, we are once again lucky and know what needs to be installed for our pipeline to work. Thus we can indicate this in our function accordingly:
set -e

image=kaczmarj/neurodocker:0.6.0

generate_docker() {
    docker run --rm ${image} \
    generate docker \
    --base ubuntu:12.04 \
    --pkg-manager apt \
    --install curl git gcc g++ imagemagick \
    xvfb r-base libgl1-mesa-dev \
    num-utils libqt4-dev \
    libqt4-opengl-dev libqt4-sql \
    libqt4-sql-mysql
}

generate_docker > Dockerfile

sed -i '29d' Dockerfile
sed -i '29d' Dockerfile
sed -i '29d' Dockerfile
Please note that depending on your pipeline, this list can be very short or very long, easy or hard to assemble. Don’t give up, searching the world wide web and asking questions in suited forums like Neurostars (www.neurostars.org) will lead to the answer! Don’t worry, these things need time, practice and experience, especially if you are new to all of this!
Ok, motivational section over, let’s continue. For the price of fully reproducible research: we now continue with: a) binge watching GoT, b) git commit our changes or c) question our career choice. It’s obviously answer b) (even though a) would also be acceptable):
$ git commit -m “add library install to generate_enigma-sulci.sh”
Now, we can recreate our Dockerfile and rebuild our container. Based on our function all we need to do is:
$ bash generate_enigma-sulci.sh
$ git commit -m “include library install in Dockerfile”
$ docker build -t enigma-sulci .
You should see that instead of recreating everything from scratch our previous container version is reused as those underlying components did not change, only the new parts are added and a new container with the same is created.
Please note that a given version of a container can never be changed, but only a new version with respective changes be created.
If you check your newly created container, you will notice a larger file size as we added additional libraries:
$ docker images

Oh, what’s that? A wild Docker image with no name and tag appeared! Let me rephrase that: “Hello Docker container my old friend…” . It is in fact the previous version of our container that was “untagged” .
Please note that rebuilding a container won’t automatically remove the current/previous version. We have do this manually using the “rmi” (remove image) command within which we provide the arbitrary IMAGE ID of the container we won’t to remove as input:
$ docker rmi 8191209b8a59
If we now check again, we can verify, that the old version was removed:
$ docker images

We are really making some progress here, awesome! Off we go to the next thing or should I say layer (muhaha → sinister laugh). While checking your code again, you remember that you installed FreeSurfer some time ago to utilize some of its functions within your pipeline. Thus, we need to include it in our container as well. To do so, we will basically conduct the steps one would normally go through, but in a Neurodocker way. More precisely, we need to run some bash commands in order to first, download the FreeSurfer software, second, unzip the downloaded file and third, set the “FREESURFER_HOME” environment variable. I assume, by now you started to worry less about these things as you already experienced Neurodocker in all its beauty. And you’re completely right to do so! Setting or running bash commands is a no-brainer with Neurodocker: the “–run-bash” argument!
The first two points are set via:
“--run-bash "curl -sSL https://surfer.nmr.mgh.harvard.edu/pub/dist/freesurfer/6.0.1/freesurfer-Linux-centos6_x86_64-stable-pub-v6.0.1.tar.gz \| tar zxv --no-same-owner -C /opt”
which runs the curl command to download the FreeSurfer software and then uses tar to unzip the downloaded file into the directory /opt. As you can see, all you have to do is pass the bash command as you would use on your local machine to the –run-bash argument. Given that we run this command during the build process of our container, the respective steps are conducted within the container, thus the directory /opt is a path in the to be created container! While typing you remember that you deleted a bunch of FreeSurfer files as they were very big and you didn’t need them for your pipeline. So, instead of packing those things in your container, thus unnecessarily increasing its size, we will just exclude them. No biggie!
“--run-bash "curl -sSL https://surfer.nmr.mgh.harvard.edu/pub/dist/freesurfer/6.0.1/freesurfer-Linux-centos6_x86_64-stable-pub-v6.0.1.tar.gz \| tar zxv --no-same-owner -C /opt \
    --exclude='freesurfer/diffusion' \
    --exclude='freesurfer/docs' \
    --exclude='freesurfer/fsfast' \
    --exclude='freesurfer/lib/cuda' \
    --exclude='freesurfer/matlab' \
    --exclude='freesurfer/mni/share/man' \
    --exclude='freesurfer/subjects/fsaverage_sym' \
    --exclude='freesurfer/subjects/fsaverage' \
    --exclude='freesurfer/subjects/fsaverage3' \
    --exclude='freesurfer/subjects/fsaverage4' \
    --exclude='freesurfer/subjects/fsaverage5' \
    --exclude='freesurfer/subjects/fsaverage6' \
    --exclude='freesurfer/subjects/cvs_avg35' \
    --exclude='freesurfer/subjects/cvs_avg35_inMNI152'\
    --exclude='freesurfer/subjects/bert' \
    --exclude='freesurfer/subjects/lh.EC_average'\
    --exclude='freesurfer/subjects/rh.EC_average'\
    --exclude='freesurfer/subjects/sample-*.mgz' \
    --exclude='freesurfer/subjects/V1_average' \
    --exclude='freesurfer/trctrain'" \\”
Good catch, that will save us, that is the Docker container, some space.
Now to the second point. In order to set environment variables, we can use the –env argument followed by the variable definition as you would do it in bash:
“--env FREESURFER_HOME="/opt/freesurfer" “
Damn, Neurodocker has it all! All we have to do now is including these things in our function:
set -e

image=kaczmarj/neurodocker:0.6.0

generate_docker() {
    docker run --rm ${image} \
    generate docker \
    --base ubuntu:12.04 \
    --pkg-manager apt \
    --install curl git gcc g++ imagemagick \
    xvfb r-base libgl1-mesa-dev \
    num-utils libqt4-dev \
    libqt4-opengl-dev libqt4-sql \
    Libqt4-sql-mysql \
    --run-bash "curl -sSL https://surfer.nmr.mgh.harvard.edu/pub/dist/freesurfer/6.0.1/freesurfer-Linux-centos6_x86_64-stable-pub-v6.0.1.tar.gz \| tar zxv --no-same-owner -C /opt \
    --exclude='freesurfer/diffusion' \
    --exclude='freesurfer/docs' \
    --exclude='freesurfer/fsfast' \
    --exclude='freesurfer/lib/cuda' \
    --exclude='freesurfer/matlab' \
    --exclude='freesurfer/mni/share/man' \
    --exclude='freesurfer/subjects/fsaverage_sym' \
    --exclude='freesurfer/subjects/fsaverage' \
    --exclude='freesurfer/subjects/fsaverage3' \
    --exclude='freesurfer/subjects/fsaverage4' \
    --exclude='freesurfer/subjects/fsaverage5' \
    --exclude='freesurfer/subjects/fsaverage6' \
    --exclude='freesurfer/subjects/cvs_avg35' \
    --exclude='freesurfer/subjects/cvs_avg35_inMNI152'\
    --exclude='freesurfer/subjects/bert' \
    --exclude='freesurfer/subjects/lh.EC_average'\
    --exclude='freesurfer/subjects/rh.EC_average'\
    --exclude='freesurfer/subjects/sample-*.mgz' \
    --exclude='freesurfer/subjects/V1_average' \
    --exclude='freesurfer/trctrain'" \
    “--env FREESURFER_HOME="/opt/freesurfer" “ }

generate_docker > Dockerfile

sed -i '29d' Dockerfile
sed -i '29d' Dockerfile
sed -i '29d' Dockerfile
We are good ReproNimers and commit the changes:
$ git commit -m “include FreeSurfer in generate_enigma-sulci.sh”
Tale as old as time: recreate the Dockerfile, commit the changes and rebuild the container!
$ bash generate_enigma-sulci.sh
$ git commit “include FreeSurfer in Dockerfile”
$ docker build -t enigma-sulci .
After you pressed “enter”, go get a coffee (or rather 10 coffees), as the FreeSurfer file is quite large and the download will take a while. And as the years have passed by, the download will eventually finish and our container will be built, this time with FreeSurfer included. As usual, we can confirm that it’s there and notice the, this time quite impressive, increase in size (wholly guacamole!). Also, we remove the old version:
$ docker images

$ docker rmi 2c5dcabac178
Ok, we’re getting somewhere. Slow but steady. Next in line is BrainVISA7, another software package your pipeline depends on. It feels like the ReproNim version of Groundhog Day doesn’t it? Wait, what’s that? You are tired of downloads and asking if we can’t just copy the software from your machine into the container somehow? Well, what do you think this is? Amateur hour? Of course we and you can bet all your other so-far unreproducible pipelines that neurodocker has you covered! However, first things first: we copy the directory that contains the software into our project directory and add it to git, committing the changes:
$ mv /home/frodo/work/brainvisa /home/frodo/enigma_shape
$ git add brainvisa
$ git commit -m “added brainvisa to the project directory”
To now copy this directory into our container during the build process, we can use the –copy argument with the directory we want to copy and where within the container as input arguments:
--copy brainvisa_4.5.0 /opt/brainvisa_4.5.0
We add it to our function (I will stop to include every instance of the function as it’s getting longer and longer. The complete, final version will be displayed at the end of this section) and conduct the well-known steps: commit and rebuild.
$ git commit -m “added brainvisa to generate_enigma-sulci.sh ”
$ bash generate_enigma-sulci.sh
$ git commit -m “added brainvisa to Dockerfile”
$ docker build -t enigma-sulci .
$ docker images
$ docker rmi
You see that thingy over there? That’s the finish line and you are almost there! The next part is your pipeline and we can use the same commands as above to include in the container building script:
--copy shape_features_pipeline /opt/shape_features_pipeline
$ git commit -m “added enigma-sulci pipeline to generate_enigma-sulci.sh ”
$ bash generate_enigma-sulci.sh
$ git commit -m “added enigma-sulci pipeline to Dockerfile”
$ docker build -t enigma-sulci .
$ docker images
$ docker rmi XXX
Wanna know what? That’s it: you isolated a computing environment and are able to share it for example using cloud storage, USB or repositories. The finish line my friend is blowing in the reprowind. You can now start work with your container via:
$ docker run enigma-sulci
Where the run command will start your container and, in this case, bring you to the shell within your container. While you could already start running (noticed the pun?) and testing your pipeline within the container, we will go one step further. This is the Reprolympics! Instead of always starting your container, cd’ing to and sourcing your pipeline, adding local data within mapped paths, you can actually save this precious time for more fun things (talking analyses of course) via automating the behavior of your container. This refers to functions or tasks that are defined to be executed during the start of your container. The other benefit besides saving time? Reproducibility!
Step 3: Automating your container
A common example of containers with such behavior are BIDS-Apps (http://bids-apps.neuroimaging.io/), containerized pipelines or applications that understand BIDS. While you could adapt your pipeline to also work very well with BIDS datasets, we won’t go down that rabbit hole for now and leave the pipeline dataset agnostic. Speaking of which, how does your pipeline work again? Oh, that’s right the main function is run_pipeline.sh and it assumes that the data you want to process are in a directory called `/freesurfer_data` and based on that wants the identifier of the participant you want to analyse within that directory as input. Furthermore, it needs a FreeSurfer license. Finally, it will save the results to a directory called /output. We can make a respective automatization happen through two steps. First, we need to tell the container that your pipeline should be executed upon starting. This behavior can be achieved through modifying the entrypoint of your container. Neurodocker’s way of doing this is the –entrypoint argument and we can use add to add the main function of your pipeline which is located in /opt/shape-features-pipeline to the entrypoint or startup of the container:
--entrypoint "/neurodocker/startup.sh /opt/ENIGMA_BV45/run_brainvisa45.sh"
With that, your main function is automatically executed every time you run your container. And now, for the last time: commit and rebuild:
$ git commit -m “added main function to entrypoint in generate_enigma-sulci.sh”
$ bash generate_enigma-sulci.sh
$ git commit -m “added main function to entrypoint in Dockerfile”
$ docker build -t enigma-sulci .
$ docker images
$ docker rmi
The next step entails an adaption of the docker run command. We need to make the data directory, the output directory and a FreeSurfer license available within our container. Quick reminder: our computing environment is isolated, the doors of the container are close, nothing in, nothing out. Except, we create the possibility for the container to interact with files and paths on your local machine or in container terms host machine. This process is called mapping and implemented through the -v flag which expects two arguments: a path or file on your host machine and a path where it should be mapped to inside the container. Adjusted to our needs, this would look as follows:
-v /home/frodo/freesurfer_outputs:/fs_data
-v /home/frodo/shape_analyses:/output
-v /home/frodo/freesurfer/license:/opt/freesurfer/license
The first two map the input data and output directory respectively, while the third maps the FreeSurfer license file. We can now bring it all together and also add the ID of the participant that should analyzed, let’s call him Spock:
docker run -v /home/frodo/freesurfer_outputs:/fs_data \
    -v /home/frodo/shape_analyses:/output \
    -v /home/frodo/freesurfer/license:/opt/freesurfer/license \
    enigma-sulci \
    Spock
This, this is the moment. Experience it in all its glory. You have come a long way. From a complex pipeline that only worked on your machine and was shared by email to an application that works for everyone that has Docker installed and can be shared via version controlled repositories that are accessible for everyone. What a ride! Let’s bring it home and actually push your container to DockerHub:

$ docker tag d06b7f5f6a55 frodo/enigma-sulci
$ docker push frodo/enigma-sulci
Your container can now be ‘pulled’ by others! However, there’s always room for more reproducibility…
Step 4: It’s getting meta
During the beginning of our ancient history, something about version controlled data was mentioned. And while this is strictly speaking not part of bringing your pipeline into a container, it should be! Because these days, we have the possibility to connect your containerized pipeline to a dataset you want to process it with. Furthermore, we version control the application of our container. The future is now! A future called DataLad8. Learn all about it here. We will discuss this further in future chapters of this story.
Step 5: Going the extra mile - automated builds, perturbation analyses and more
There are many more chapters to this never-ending story. Stay tuned for more ways to enhance your reproducibility and efficiency. Chapters will include: automated builds from github; testing different base systems to see if updates to newer base is possible; and many more.
What did this cost me?
In the long term, this did not cost you much, all the steps covered here are things you already had to do anyway. You procured a computer, you installed a base operating system, you installed a bunch of software tools you needed and solved their dependencies, you developed a processing script, and you used that script. The cost, in this example, of a retrospective application of these procedures is in remembering what you had to do in order to make this work, which could have been a development timeline that spanned multiple years. And you had to learn about containerization, Docker specifically in this case, and a new tool to help you perform containerization (NeuroDocker, in this case).
What have I gained?
Going forward, building each of your specific processing workflows using the complete enumeration of all the details necessary to the implementation of that process greatly facilitates your own reuse of the workflow going forward. You have gained clarity and reproducibility and complete ‘describability’ for your ‘future self’, the readers of wonderful manuscripts, and provide a foundation upon which your results and conclusions can more seamlessly fit into the fabric of the emerging scientific knowledge. Also, your shared container is a scientific product of your research efforts, and itself is reusable, citable, and can be a source of scientific productivity to advance your research career. You can’t get any of that from a script sitting on your lab computer…